If you’ve ever cut someone out of a photo, used a portrait-mode camera, or watched a self-driving car video where lanes and pedestrians are highlighted in different colors, you’ve seen image segmentation in action. Behind those familiar effects is a single technical idea: instead of asking “what’s in this image?” or “where is it?”, segmentation asks “which pixels belong to what?” This post walks through what segmentation is, the three main flavors people work with, and how it’s evolved from manual selection tools into models you can drive with a single click.
What is image segmentation?
In computer vision there’s a tidy hierarchy of how much detail a model gives you about an image. Classification tells you what’s in the image. Detection tells you what’s in there and roughly where. Segmentation goes one step further and labels every single pixel.
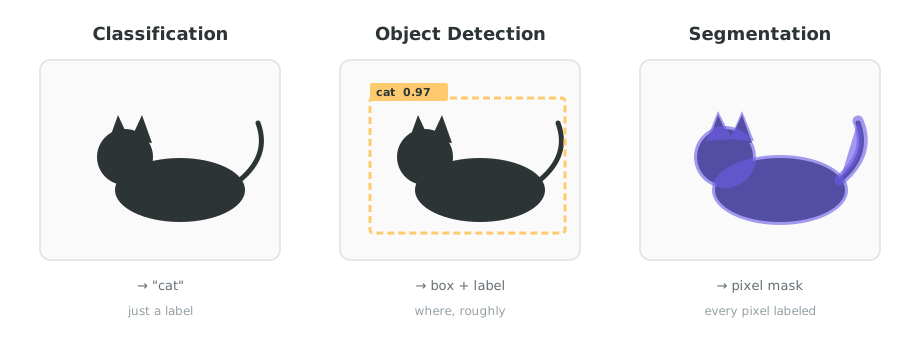
The “every pixel” part is what makes segmentation powerful. A bounding box is a useful summary, but it includes background pixels you don’t want and excludes parts of the object that stick outside the rectangle. A pixel-level mask gives you the exact silhouette — which is what you need for compositing, editing, measuring, or any downstream task that cares about an object’s actual shape.
Mathematically, a segmentation model takes an image with H×W pixels and outputs an H×W label map. Each entry says “this pixel is class N” or “this pixel is instance K of class N.” Everything else in this post is a variation on that idea.
Three flavors: semantic, instance, panoptic
Once you accept “label every pixel,” you immediately bump into a question: what counts as a separate object? Three different answers gave us three flavors of segmentation, all of which are in active use today.
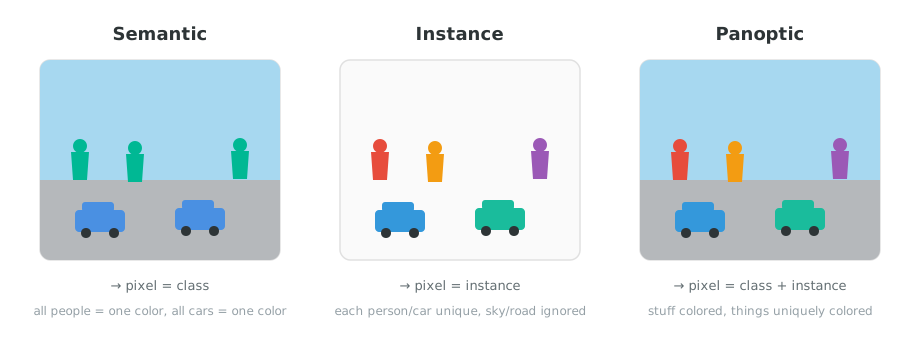
Semantic segmentation only labels pixels by class. Every “person” pixel gets the same label, regardless of how many people are in the scene. This is the simplest formulation and works well for things you don’t need to count individually — sky, road, vegetation, water.
Instance segmentation flips the question: it cares which person, not just that it’s a person. Each individual instance gets its own label, but typically only for “things” — countable, discrete objects. The amorphous “stuff” (sky, road, grass) is usually ignored.
Panoptic segmentation is the union of the two: things get instance labels, stuff gets class labels, and every pixel gets exactly one assignment. It’s the most useful in practice for scene understanding (autonomous driving, robotics, AR) but also the most expensive to compute.
The “things” vs. “stuff” terminology was popularized by the panoptic segmentation paper that introduced the unified task in 2018, and it’s stuck.
A short history
Segmentation has been around since digital image editing existed. The big shift over the last 30 years has been who does the labeling: humans, then handcrafted algorithms, then learned models, and most recently general-purpose models that don’t need to be trained on your specific objects.
timeline
    title Three Eras of Image Segmentation
    1990s - early 2000s : Manual / rule-based : Lasso, Magic Wand, edge detection
    2010s : Deep learning : FCN, U-Net, Mask R-CNN
    2023 onward : Foundation models : SAM, SAM2 — click anything
In the manual era, you’d lasso the object pixel by pixel. The Magic Wand was the first hint of automation — it grouped neighboring pixels by color similarity. Active Contours (“snakes”) and GrabCut added cleverer algorithms, but they all still needed human guidance to start.
The deep learning era (~2015 onward) was the first time a model could segment a whole scene from a single forward pass. FCN and U-Net showed how to turn a classifier into a per-pixel labeler. Mask R-CNN added per-instance prediction.
The most recent shift came with foundation models like Meta’s SAM (2023) and SAM2 (2024). These are trained once on a huge variety of images and can segment objects they’ve never been explicitly told about, often from a single click — no per-class training required.
For a deeper walk through the algorithms in each era, see Image Segmentation Explained: From Manual Selection to AI.
How a modern segmenter works
Almost every modern segmentation model — semantic, instance, or panoptic — shares the same backbone shape: an encoder that compresses the image into a dense feature map, and a decoder that expands those features back out into a pixel-level prediction.
flowchart LR
    A["Input<br/>image"] --> B["Encoder<br/>(CNN or ViT)"]
    B --> C["Feature<br/>map"]
    C --> D["Decoder"]
    D --> E["Pixel<br/>mask"]
    P["Prompt<br/>(point / box)"] -. optional .-> D
The encoder is usually a CNN (like ResNet) or a Vision Transformer (ViT). It looks at the image at progressively coarser resolutions, building up an understanding of what’s where. By the time it’s done, you don’t have a high-resolution image anymore — you have a low-resolution stack of “feature channels” that encode semantic information.
The decoder’s job is to upsample those features back to full resolution while preserving sharp boundaries. This is harder than it sounds: the encoder threw away spatial detail to gain semantic understanding, and the decoder has to put it back. U-Net’s famous trick was to wire encoder layers directly to decoder layers at matching resolutions (“skip connections”), so the decoder can borrow the original detail when it needs to draw a clean edge.
Modern foundation models add a third piece: a prompt encoder. SAM and SAM2 separate the image embedding (computed once per image) from the prompt — a click, box, or rough mask — which is computed per interaction. This lets one expensive forward pass support many cheap interactive clicks, which is why interactive tools using SAM feel instant after the first second of loading.

For the SAM2-specific architecture and how a desktop app integrates it locally with ONNX Runtime and CoreML, see AI Segmentation with SAM2 in WobblePic.
Where it shows up in real life
Segmentation is one of those technologies that’s invisibly everywhere once you start looking. Four of the largest application areas:
Medical imaging uses segmentation for tumor outlining, organ measurement, and surgical planning. Radiologists rely on it to compute volumes from 2D slices and to keep measurements consistent across scans.
Autonomous driving needs to know exactly where the lane edges are, where pedestrians end and shadows begin, where parked vehicles stop and the road resumes. Bounding boxes aren’t enough at this level of precision.
Photo editing has been transformed by segmentation. Background removal, portrait mode blur, sky replacement, and “select subject” tools are all powered by segmentation models. The shift from lasso to one-click selection is essentially the SAM era reaching consumer apps.
AR / VR uses real-time segmentation so virtual objects can interact realistically with the physical scene — appearing behind a desk, casting shadows on a person, or stopping at the edge of a wall.
You’ll also find it in satellite imagery (crop classification, deforestation monitoring), industrial inspection (defect detection), and motion graphics (rotoscoping, which used to take hours per frame).
Try it yourself
The fastest way to get a feel for segmentation is to use a tool that exposes it directly:
- Meta’s SAM2 demo at sam2.metademolab.com is the official browser demo. Upload any image and click — no install required.
- Open-source libraries like
segment-anything-2,mmsegmentation, anddetectron2are good if you want to integrate segmentation into your own pipeline. - Desktop apps that expose “subject select” or “smart selection” in modern image editors are almost certainly powered by a segmentation model under the hood. WobblePic is one example: you click an object, SAM2 segments it, and only that region wobbles independently of the rest of the image.
Once you see how confidently a modern model can isolate something — a single leaf in a pile, a person partially occluded by a sign, the strap of a bag against a similarly-colored coat — the difference from old click-and-trace tools becomes obvious. That’s the leap segmentation has made over the last few years.