Tutorial
Learn how to use WobblePic step by step.
1. Getting Started
Installation
WobblePic is available for Windows and macOS. Visit the Download page to pick the right installer for your platform.
Windows:
- Download
WobblePic_Setup_X.X.X.exefrom the Download page. - Run the installer and follow the on-screen instructions.
- Launch WobblePic from the desktop shortcut or Start Menu.
macOS:
- Download the DMG matching your Mac:
arm64.dmgfor Apple Silicon,x64.dmgfor Intel. - Open the DMG and drag WobblePic.app into the Applications folder.
- Launch WobblePic from Launchpad or the Applications folder. Since v1.4.6 the macOS build is signed and notarized by Apple, so it opens with a normal double-click — no security workaround needed.
Opening Images
There are several ways to open images in WobblePic:
- Right-click an image file in Explorer/Finder → "Open with" → WobblePic
- Drag and drop an image file or folder onto the WobblePic window
- Launch directly — WobblePic reopens the folder you were last in (your Pictures folder on a first run)
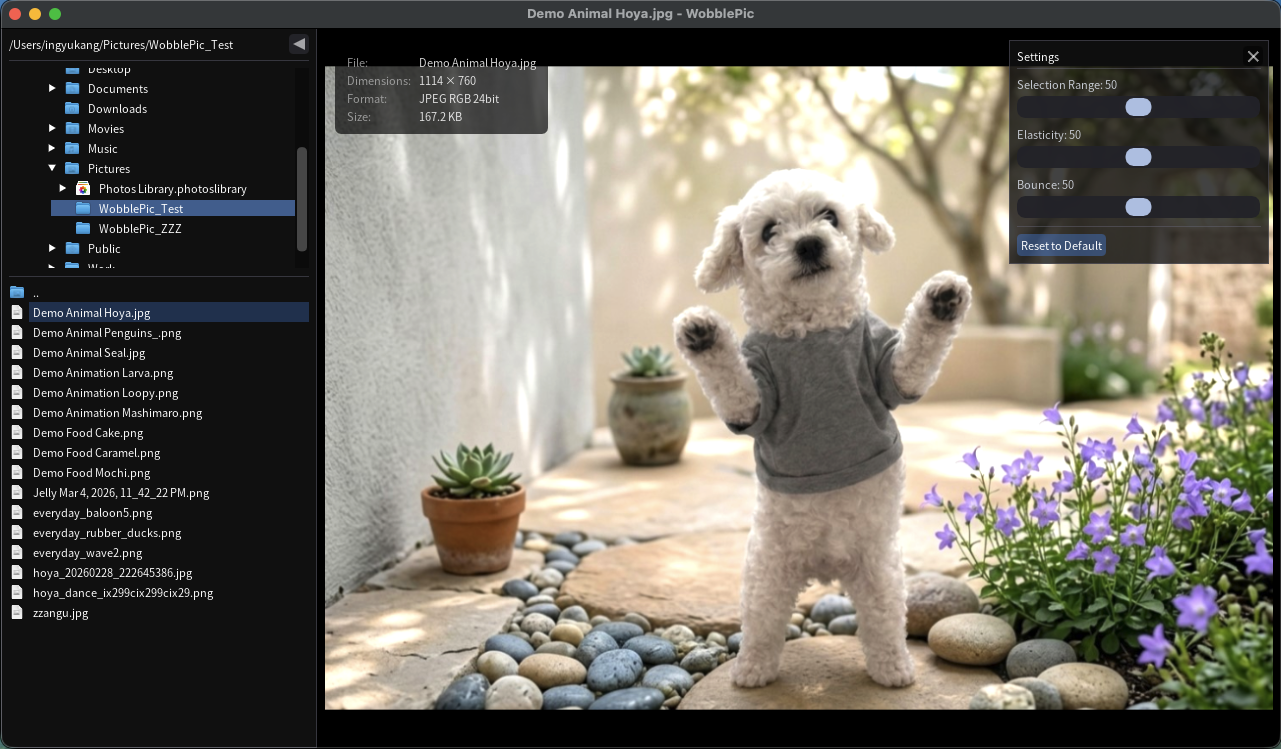
WobblePic main window with file explorer panel and image viewer
2. Basic Controls
Wobble!
Click and drag anywhere on the image. The surface stretches like skin, following your mouse. Release the mouse button and watch it bounce back with spring physics and inertia.
Drag the image and watch it wobble back with spring physics
Pin Deformation
While dragging, press Right-click or P to pin the deformation in place. The image stays stretched even after you release the mouse, and you can wobble other areas. A red dot marks each pin.
- Up to 4 pins at the same time
- Click a red dot to release that pin (bounces back)
- Click outside the mask to release all pins
- ESC — Release all pins (each bounces out) and clear segmentation
Settings Panel
Hover over the gear icon in the top-right of the image area to open the settings panel.
- Selection Range — Adjust how much area SAM2 selects on click
- Elasticity — Control how stretchy the image feels (0 = stiff, 100 = very stretchy)
- Bounce — Control how much it bounces back (0 = no bounce, 100 = very bouncy)
Changes apply instantly. Settings are saved automatically when you close the panel or exit the app.
Navigate Images
- Down/Up Arrow or Space/Backspace — Next/Previous image
- Adjacent images are preloaded in the background for instant switching.
Zoom & Pan
- Mouse Wheel or +/- keys — Zoom in/out (up to 10x, centered on mouse position)
- Space + Drag or Middle Mouse Drag — Pan the image
- Arrow keys while zoomed — Pan the image
Rotate & Delete
- R or Shift+L — Rotate 90° clockwise
- L or Shift+R — Rotate 90° counter-clockwise
- Delete — Move current image to Recycle Bin (with confirmation)
Image Info
Press I to toggle the image info overlay, which shows the filename, resolution, format, and file size.
3. AI Segmentation
WobblePic uses SAM2 (Segment Anything Model 2) to automatically detect objects in your image. Once segmented, only the selected area wobbles while the background stays fixed.
Select an Object
- Click on an object — SAM2 automatically detects and segments it (point prompt)
- Drag a rectangle around an object — Select by bounding box (box prompt)
The segmented area appears slightly brighter, while the background dims — so you can clearly see what's selected.
Click to segment an object, then drag to wobble only the selected area
Refine the Selection
- Shift + Click/Drag — Add to the current segment
- Alt + Click/Drag — Remove from the current segment
Move a Segment
Use Ctrl + Drag to move the selected segment around while the background stays fixed.
How It Works Behind the Scenes
- SAM2 model loads in the background — you can start viewing images immediately
- Image encoding runs in a separate worker process (~5 seconds), so it never blocks your interaction
- Decoding (segmentation) is instant (~50ms) when you click
- If encoding isn't finished yet, the entire image area wobbles (no segmentation)
- Adjacent images are pre-encoded for seamless switching
4. Wobble Recording
Capture your wobble interactions as a video or animation — drag, pin, and the post-release bounce all saved in one file. Available since v1.3.7; MP4 and GIF output added in v1.5.1.
How to Record
- Press Ctrl+R (or right-click the image area and choose "Record wobble"). A red-dot "Ready to record" indicator appears at the bottom of the image area — you're now in armed state.
- Begin a wobble drag, or click the indicator. The indicator switches to a blinking red-square "Recording" pill.
- Wobble freely — drag, add pins, drag again. Multiple deformation passes are captured continuously in one file.
- Press Ctrl+R again or click the indicator to stop. (Press ESC to cancel without saving.)
- A brief "Saving..." state appears, followed by a "Saved: filename" toast confirming the file was written.
Tips & Limits
- Recording stops automatically after 30 seconds as a safety limit.
- While armed, you can still adjust segmentation (click, Shift+click, etc.) without starting the recording — only the wobble drag triggers the actual capture.
- Pick the output under Recording format in the settings panel (gear icon): MP4 (default), GIF, or WebP. MP4 is the smallest and fastest to save, and the only one Instagram, TikTok, and X accept — animated WebP is rejected or stripped by most platforms.
- The armed indicator shows the format you are about to record in ("Ready to record · MP4"), so you find out before the recording rather than after.
- GIF and WebP recordings play in any modern browser, image viewer, or — naturally — WobblePic itself (see next section).
5. Animated Image Playback
Open any animated WebP, GIF, or APNG file and a small controls bar appears at the bottom-left of the image area. The default state is paused on the first frame — matching how static images load. Available since v1.3.7.
Play / Pause
- Space — Toggle play/pause (when an animated image is loaded).
- ▶ / ⏸ buttons in the controls bar.
- ESC — Pause active playback (also clears any pins and segmentation, as usual).
Wobble an Animated Image
You can wobble any animated image, but only the first frame is wobble-ready — and that's by design.
- While playing or paused on any frame, click or drag to instantly rewind to the first frame and start wobbling there.
- SAM2 segmentation is preloaded for the first frame, so wobbling animated images feels just as immediate as wobbling static ones.
- Per-frame wobbling is on the roadmap for a future release.
Zoom and Pan
Zoom and pan are preserved when toggling playback, so you can zoom into a detail and keep watching.
6. File Explorer Panel
The left side panel shows a file explorer with folders and image files in the current directory.
- Click a folder — Navigate into that folder
- Click ".." — Go up to the parent directory
- Click an image file — Switch to that image (current selection is highlighted)
- Each item displays its Windows system icon for easy identification
Quick Access
The top of the tree has a Quick Access group with one-click shortcuts to your four standard user folders: Desktop, Downloads, Documents, and Pictures. Click any entry to jump there instantly without expanding the tree from your home folder every session. Available since v1.4.0.
Context Menu & Clipboard
- Right-click any item for a context menu — Open, Edit, Print, Cut, Copy, Rename, Delete
- F2 — Rename a file inline
- Ctrl+C / Ctrl+X / Ctrl+V — Copy, Cut, Paste files (works with Windows Explorer and Finder)
- Ctrl+V with an image on the clipboard — Pastes a picture copied from a browser, screenshot tool or image editor. It is saved to
Pictures/WobblePic Pastedand opens immediately. Available since v1.5.3
You can also drag and drop image files or folders from Windows Explorer directly into the WobblePic window to open them instantly.
7. Keyboard Shortcuts
On macOS: Replace Ctrl with Cmd and Alt with Option. Trackpad pinch-to-zoom is also supported natively.
| Image Navigation | |
| Next image | Down Arrow / Space (plays/pauses for animated images) |
| Previous image | Up Arrow / Backspace |
| Navigate while zoomed | Ctrl / Alt + Up/Down Arrow |
| Zoom in | Mouse Wheel Up / + / Pinch out (macOS) |
| Zoom out | Mouse Wheel Down / - / Pinch in (macOS) |
| Pan image | Space + Drag / Middle Mouse Drag |
| Rotate clockwise | R / Shift+L |
| Rotate counter-clockwise | L / Shift+R |
| Delete image | Delete |
| Wobble & Segmentation | |
| Wobble | Left-click + Drag |
| Segment object (point) | Click (outside mask) |
| Segment object (box) | Drag (outside mask) |
| Add to segment | Shift + Click/Drag |
| Remove from segment | Alt + Click/Drag |
| Move segment | Ctrl + Drag |
| Zoom segment only | Ctrl + Mouse Wheel |
| Pin deformation | Right-click or P (while dragging) |
| Release single pin | Click red pin dot |
| Record wobble (start/stop) | Ctrl + R |
| Interface | |
| Release all pins / clear segmentation | ESC (also pauses animation) |
| Toggle file explorer panel | Ctrl + B |
| Toggle image info overlay | I |
| Toggle panel focus | Tab |
| Rename file | F2 |
| Open tutorial | F1 |
| Image context menu | Right-click on image |